Welcome to my blog!

I am a stay at home Mom of 3 living in Southern NH. This blog combines my love for my children, photography and cooking. Enjoy!
Showing posts with label dessert. Show all posts

Friday, March 18, 2011

Monkey Bread

I wanted to make a yummy treat for the girls as an afterschool snack.  If you are a couponer like I am, you likely have a lot of (free!) cans of biscuits in your fridge.  I timed it just right so that they came out of the oven about 10 minutes before the girls got off the bus.  The house smelled incredible when we walked in from the bus stop.

  March 2011 014 March 2011 015

Monkey Bread

Ingredients:

1/2 cup granulated sugar

1 teaspoon cinnamon

2 cans (16.3 oz each) refrigerated buttermilk biscuits or 4 mini cans of biscuits

1 cup diced apple, if desired (i made mine with apples but no nuts or raisins)

1/2 cup chopped walnuts, if desired

1/2 cup raisins, if desired

1 cup firmly packed brown sugar

3/4 cup butter or margarine, melted

Directions:

  • Heat oven to 350°F. Lightly grease 12-cup fluted tube pan with shortening or cooking spray. In large -storage plastic food bag, mix granulated sugar and cinnamon.
  • Separate dough into 16 biscuits; cut each into quarters. Shake in bag to coat. Arrange in pan, adding apples or walnuts and raisins among the biscuit pieces if desired.
  • In small bowl, mix brown sugar and melted butter; pour over biscuit pieces.
  • Bake 28 to 32 minutes or until golden brown and no longer doughy in center. Cool in pan 10 minutes. Turn upside down onto serving plate; pull apart to serve. Serve warm.


Within 10 minutes of them being home they had already but a big dent in it.  They begged for a bit more after dinner.

March 2011 008March 2011 005

Monday, March 8, 2010

Mounds Bar Cake – Blog Carnival

Technorati Tags:

I joined a recipe blog carnival with friends in the hope that it will get my blogging more consistently.

I chose to share a delicious cake recipe. I am kicking myself for not taking a picture of the finished product after I made it last week. You will have to trust me though, it looks AND tastes fantastic.

Mounds Bar Cake

1 box chocolate cake mix (or your favorite homemade chocolate cake)

1 cup milk

14oz. shredded coconut

1/2 cup milk

1 1/2 cup chocolate chips

24 large marshmallows (or 3 cups mini marshmallows)

1 cup sugar

1 1/2 cups sugar

1 stick butter

Follow directions for the cake mix; bake in 9x13 inch pan**. Heat marshmallows, 1 cup milk, and 1 cup sugar until the sugar and marshmallows melt. Stir in coconut and pour over cake.

Heat 1 1/2 cups sugar, 1/2 cup milk and the stick of butter to boiling. Remove from heat and add chocolate chips; stir until melted. Pour over coconut layer. Refrigerate to set the chocolate glaze (I serve it chilled – it just tastes better). Cut the pieces small because this cake is VERY rich.

Tastes like a mounds bar on top of a cake.

**I made this in a 9X13 pan as indicated above but next time I plant to try it in a 2 layer round.

Tuesday, March 17, 2009

Recipe - Mini Cupcake Bites

I saw these:


on here: http://bakerella.blogspot.com/2008/05/cupcake-bites-made-easy.html and I just knew that I needed to try to make these. I showed the recipe to my girls and they asked if we could make them for their Gramma's birthday so that is exactly what we did.

Here are the directions from Bakerella herself: (my notes in bold)

1 box cake mix (cook as directed on box for 13 X 9 cake)
1 can cream cheese frosting (16 oz.) (I used buttercream frosting)
1 package chocolate bark (chocolate chips will work too) for cupcake bottom
Colored Candy Melts (for cupcake top)
Sprinkles and m&ms for decoration

  1. After cake is cooked and cooled completely, crumble into large bowl. (The texture should be fine/fluffy)


  2. Using the back of a large spoon, mix thoroughly with 1 can cream cheese frosting. (It may be easier to use fingers to mix together, but be warned it will get messy.)


  3. Roll mixture into quarter size balls (make sure they are smaller in diameter than that of your candy mold) and lay on wax paper covered cookie sheet.


  4. Chill in the freezer for a few minutes, until they are slightly firm, not frozen. (it took mine a while to set -at least 30 minutes)


  5. Melt chocolate bark and candy melts in microwave per directions on package.


  6. Using a spoon or squeeze bottle, fill each mold cavity with a small amount of chocolate. Sorry, I didn't think to measure how much. But as soon as you fill the cavity, go ahead and place one of your rolled balls into it. Carefully push it down until the force causes the chocolate to push up and fill in around the sides of the ball. You may have to experiment with a couple to get the right amount. Stop pushing once the chocolate reaches the top edge.


  7. Place the mold tray filled with cupcakes in the freezer for just a few minutes to let the chocolate set. Remove and then gently pull up on the cake ball top to release from candy mold. (again, it took mine at least 30 minutes in the freezer to set)


  8. Now, holding the bottom of the cupcake, dip the top in another color of melted chocolate.


  9. Decorate.


  10. And, probably impress your friends and family.


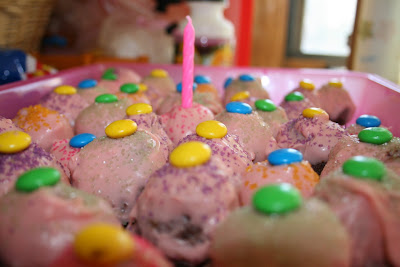
Here was my end result:
Not quite as perfect looking as hers but they sure did taste good!